

![]()
My friends Leo, Eric, and I decided to do a snow trip to the Loch Leven lakes area in mid March. We decided on this particular trip because of the easy access from Highway 80 and plowed parking. Go past Blue Canyon on Highway 80 eastbound and then use the Big Bend exit and make a left at the "T". There is a ranger station (Big Bend Visitor Center) that used to be open year round. Apparently due to budget cuts that is not the case anymore. We drove right past the trail head parking lot as it was not plowed. No worries I thought we could park at the closed ranger station. But no such luck there are signs saying parked cars will be towed. OK so I knew there was decent parking lot at the Rainbow Lodge (bed and breakfast place). Well although there is plenty of parking but after checking inside we found out they do not allow overnight parking (in case they have to plow they won't be able to have us move the car). Ummm.. Ok. So we decided that we would chance it and park along a wide section of road near where the road goes under Highway 80 again (past the Rainbow Lodge). The lesson here is to always remember to call ahead to the Ranger Station to get current trail and PARKING conditions!!
 Here are Leo and Eric as we hiked it from the car to the Rainbow Lodge.
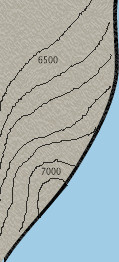
You can just make it out in the distance. See map
below of our trip. The one benefit of no trail head parking lot and
the Ranger Station lot being closed is there is no one on the snow.
Ok so there were a couple people, but it felt like a weekday trip more
than a weekend one. Day hikers had to park at the Rainbow Lodge which
I guess would be OK, but I would double check first as we only asked
about overnight parking.
Here are Leo and Eric as we hiked it from the car to the Rainbow Lodge.
You can just make it out in the distance. See map
below of our trip. The one benefit of no trail head parking lot and
the Ranger Station lot being closed is there is no one on the snow.
Ok so there were a couple people, but it felt like a weekday trip more
than a weekend one. Day hikers had to park at the Rainbow Lodge which
I guess would be OK, but I would double check first as we only asked
about overnight parking.
 So
we made it to the "trail head"... Well not really but Rainbow
Lodge had a good spot to get onto the snow and it was past the river
so no stream crossings would be needed. Well just a couple of minor
stream crossings but the snow depth was still enough to make the crossings
safe. Here is Leo next to some stone column just past the lodge lot.
It looks like a chimney but it isn't.
So
we made it to the "trail head"... Well not really but Rainbow
Lodge had a good spot to get onto the snow and it was past the river
so no stream crossings would be needed. Well just a couple of minor
stream crossings but the snow depth was still enough to make the crossings
safe. Here is Leo next to some stone column just past the lodge lot.
It looks like a chimney but it isn't.
 So
here we are making a trail up the mountain. We followed some tracks
in spots but here is a section where we were blazing a trail. We were
sinking in 6 to 8 inches even on snow shoes. Taking your time when going
uphill on snow, especially with a heavy pack, is a must. Go at a comfortable/sustainable
pace and make sure to stop and look around occasionally. You can always
use the excuse of having to get your bearings for the trip back out
the next day. It is a valid excuse (and a good idea even if you have
GPS) as you don't want to get lost in the snow.
So
here we are making a trail up the mountain. We followed some tracks
in spots but here is a section where we were blazing a trail. We were
sinking in 6 to 8 inches even on snow shoes. Taking your time when going
uphill on snow, especially with a heavy pack, is a must. Go at a comfortable/sustainable
pace and make sure to stop and look around occasionally. You can always
use the excuse of having to get your bearings for the trip back out
the next day. It is a valid excuse (and a good idea even if you have
GPS) as you don't want to get lost in the snow.
 Here
we are following what looked like tracks from a decent sized group on
snow shoes. This shot is of Leo as he checks the distance to the top.
It always seems like that top is just within reach... until you get
to that 'top" and see there is just a little further to the next
'top'. Getting up and over this ridge is a must though as on the other
side you don't hear the highway nearly as much.
Here
we are following what looked like tracks from a decent sized group on
snow shoes. This shot is of Leo as he checks the distance to the top.
It always seems like that top is just within reach... until you get
to that 'top" and see there is just a little further to the next
'top'. Getting up and over this ridge is a must though as on the other
side you don't hear the highway nearly as much.
 Here
is a shot of the power of water. Water seeps into these boulders freezes
then literally breaks it in two. I wonder how many freeze/thaw cycles
must happen until the rock splits this much.
Here
is a shot of the power of water. Water seeps into these boulders freezes
then literally breaks it in two. I wonder how many freeze/thaw cycles
must happen until the rock splits this much.
 So
here is where we usually set up camp. It has a great view of the surrounding
ridges and just far enough from the highway to make it a memory. The
train is where the tree line stops in the distance and at night it is
awesome so see the ridge light up from the train as it chugs up (or
glides down) the mountain. The line is used by both freight and passenger
trains and is active so make sure if you plan on crossing them you are
very cautious. Trains going down the grade are especially hard to hear
as the snow absorbs the sound. Hikers have been killed crossing these
tracks.
So
here is where we usually set up camp. It has a great view of the surrounding
ridges and just far enough from the highway to make it a memory. The
train is where the tree line stops in the distance and at night it is
awesome so see the ridge light up from the train as it chugs up (or
glides down) the mountain. The line is used by both freight and passenger
trains and is active so make sure if you plan on crossing them you are
very cautious. Trains going down the grade are especially hard to hear
as the snow absorbs the sound. Hikers have been killed crossing these
tracks.
 Here
I am around camp. Well we are actually still walking around in our packs
and snow shoes in order to flatten out a good spot for our tent. Make
sure that you take the time to do this as it makes setting up your tent
much easier later. Don't do it too much later in case the weather turns.
You will want to have some shelter out of the snow.
Here
I am around camp. Well we are actually still walking around in our packs
and snow shoes in order to flatten out a good spot for our tent. Make
sure that you take the time to do this as it makes setting up your tent
much easier later. Don't do it too much later in case the weather turns.
You will want to have some shelter out of the snow.
 This
picture shows my Sierra Design Omega CD tent. It has served me well
and stood up to some decent snowfall. The wind was blowing pretty good
so I built a quick wall around the the back of the tent to provide a
little protection. I bring bamboo and precut guy lines to anchor the
tent. Bury the bamboo with the rope looped around it (but not tied)
and then wait a few minutes for the snow to set up before tying your
rainfly to it. Use an adjustable knot to allow for tightening later.
This
picture shows my Sierra Design Omega CD tent. It has served me well
and stood up to some decent snowfall. The wind was blowing pretty good
so I built a quick wall around the the back of the tent to provide a
little protection. I bring bamboo and precut guy lines to anchor the
tent. Bury the bamboo with the rope looped around it (but not tied)
and then wait a few minutes for the snow to set up before tying your
rainfly to it. Use an adjustable knot to allow for tightening later.
 So
our kitchen is on the right and Eric's shelter is the hole on the left.
Snow depth wasn't quite high enough to build a big enough shelter to
house all of us. Eric was eager to try out sleeping in the snow and
we were able to get a decent one man shelter dug for him. Again we built
a high wall to protect our kitchen from the wind. It really worked well.
Make sure to leave good water making snow chunks near your cooking area
of the kitchen, so when you start making water (melting snow) you don't
have to leave the kitchen.
So
our kitchen is on the right and Eric's shelter is the hole on the left.
Snow depth wasn't quite high enough to build a big enough shelter to
house all of us. Eric was eager to try out sleeping in the snow and
we were able to get a decent one man shelter dug for him. Again we built
a high wall to protect our kitchen from the wind. It really worked well.
Make sure to leave good water making snow chunks near your cooking area
of the kitchen, so when you start making water (melting snow) you don't
have to leave the kitchen.
 Here
is a close up of the kitchen. Simple design with a bench on the back
for the three of us that is high enough to keep our feet off the snow.
We then had a long high counter across from the bench (slightly higher)
with some storage below. Crafting a snow kitchen can be as fancy as
you want to make it. Truly amazing kitchen can be built out of snow
given enough time. Just don't make them too big as a big kitchen will
be colder than one sized only big enough for everyone in your group.
You aren't likely to have anyone drop in on you, so extra seating is
a waste. Make sure you bring something insulated to sit on or you won't
likely be in the kitchen for very long.
Here
is a close up of the kitchen. Simple design with a bench on the back
for the three of us that is high enough to keep our feet off the snow.
We then had a long high counter across from the bench (slightly higher)
with some storage below. Crafting a snow kitchen can be as fancy as
you want to make it. Truly amazing kitchen can be built out of snow
given enough time. Just don't make them too big as a big kitchen will
be colder than one sized only big enough for everyone in your group.
You aren't likely to have anyone drop in on you, so extra seating is
a waste. Make sure you bring something insulated to sit on or you won't
likely be in the kitchen for very long.
 We
were surprised by a visit from the infamous (and stealthy) Loch Leven
Black Ninja. Ok so maybe stealthy is a bit of a stretch. Notice how
I stood my ground and snapped this picture even after the ninja appeared
to be gearing up for some type of combination attack. After I took this
shot the ninja disappeared just as quickly as he showed up (into the
tent). Luckily no one was harmed.
We
were surprised by a visit from the infamous (and stealthy) Loch Leven
Black Ninja. Ok so maybe stealthy is a bit of a stretch. Notice how
I stood my ground and snapped this picture even after the ninja appeared
to be gearing up for some type of combination attack. After I took this
shot the ninja disappeared just as quickly as he showed up (into the
tent). Luckily no one was harmed.
 So
we had three stoves on this trip and an extra bottle of fuel. Yes, that
is overkill but we each wanted to see how our stoves did in the cold.
Well I already knew how my stove would do, awesome! I was hoping that
the other stoves would present more of a challenge, but I was disappointed.
The final ranking was Mark, Leo and then Eric. But Eric's alcohol stove
was cool (maybe too cool) and you could always just drink the "fuel"
if you wanted to warm your insides. Not recommended for Leo's as it's
a white gas stove. What I learned on this trip is that I should always
bring my stove, but maybe look into some insulation to prevent the slow
sinking of it into the kitchen counter.
So
we had three stoves on this trip and an extra bottle of fuel. Yes, that
is overkill but we each wanted to see how our stoves did in the cold.
Well I already knew how my stove would do, awesome! I was hoping that
the other stoves would present more of a challenge, but I was disappointed.
The final ranking was Mark, Leo and then Eric. But Eric's alcohol stove
was cool (maybe too cool) and you could always just drink the "fuel"
if you wanted to warm your insides. Not recommended for Leo's as it's
a white gas stove. What I learned on this trip is that I should always
bring my stove, but maybe look into some insulation to prevent the slow
sinking of it into the kitchen counter.
 Here
is a shot of the view from the kitchen. Make sure to put some warm and
dry layers on (if you haven't already) once the sun starts to disappear.
It will get cold quick and the best way to stay warm is to never get
cold in the first place.
Here
is a shot of the view from the kitchen. Make sure to put some warm and
dry layers on (if you haven't already) once the sun starts to disappear.
It will get cold quick and the best way to stay warm is to never get
cold in the first place.
 Here
is us all bundled in the kitchen that evening. Notice the customized
insulated pads for our behinds. Thanks Eric! Our kitchen counter looks
less than plumb in this shot but I assure you it was not.
Here
is us all bundled in the kitchen that evening. Notice the customized
insulated pads for our behinds. Thanks Eric! Our kitchen counter looks
less than plumb in this shot but I assure you it was not.
 Here
we are around dinner time. Notice the Mountain House pouches. I prefer
to have easy meals in the snow... well to be honest, I prefer to have
easy meals whenever I am backpacking. Cuts down on dishes and general
cleanup. Hot beverages are a must and a fortified wine isn't bad either.
Of course realize that alcohol does not truly make you warmer (although
it does make you feel warmer).
Here
we are around dinner time. Notice the Mountain House pouches. I prefer
to have easy meals in the snow... well to be honest, I prefer to have
easy meals whenever I am backpacking. Cuts down on dishes and general
cleanup. Hot beverages are a must and a fortified wine isn't bad either.
Of course realize that alcohol does not truly make you warmer (although
it does make you feel warmer).
 Getting
darker now. I was using my backup camera but it still did a decent job.
Shooting in the snow is hard as the camera has so much light when the
sun is out it can be hard to get good detail of the actual snow.
Getting
darker now. I was using my backup camera but it still did a decent job.
Shooting in the snow is hard as the camera has so much light when the
sun is out it can be hard to get good detail of the actual snow.
 So
that night there was a fair amount of snow (enough to put a few inches
on the ground). You never know when your tracks on the way in may get
buried by snow, so make sure that you are comfortable navigating by
map/compass. I am a fan of GPS, but don't count on that as your only
option to navigate back to the car. Anything that runs on batteries
can fail when the temperature is low enough.
So
that night there was a fair amount of snow (enough to put a few inches
on the ground). You never know when your tracks on the way in may get
buried by snow, so make sure that you are comfortable navigating by
map/compass. I am a fan of GPS, but don't count on that as your only
option to navigate back to the car. Anything that runs on batteries
can fail when the temperature is low enough.
 Here
is our ABC logo stamped out in the snow.
Here
is our ABC logo stamped out in the snow.
 Another
shot that morning with is actively snowing. Packing up while it is actively
snowing is not much fun. In general packing up while your hands are
freezing (I can't pack well with gloves on) is not fun. It was beautiful
out there though.
Another
shot that morning with is actively snowing. Packing up while it is actively
snowing is not much fun. In general packing up while your hands are
freezing (I can't pack well with gloves on) is not fun. It was beautiful
out there though.
 So
eventually we got packed up and started to head out. With our shells
on we headed in a generally north and downhill direction. Going downhill
in snow shoes is a blast (especially compared to uphill). You can go
as fast as you are comfortable. I recommend trying your speed out without
your pack to start, and on a section of soft obstruction free snow.
So
eventually we got packed up and started to head out. With our shells
on we headed in a generally north and downhill direction. Going downhill
in snow shoes is a blast (especially compared to uphill). You can go
as fast as you are comfortable. I recommend trying your speed out without
your pack to start, and on a section of soft obstruction free snow.
 Another
shot is the snow. Notice how you cannot see the ridge in the background
anymore (this condition can make navigating more difficult). The key
is to always know where you are. This trip is pretty easy as the distance
is really short and no matter what direction you head downhill you will
hit the road or highway. Of course avoiding the river/streams is important.
Another
shot is the snow. Notice how you cannot see the ridge in the background
anymore (this condition can make navigating more difficult). The key
is to always know where you are. This trip is pretty easy as the distance
is really short and no matter what direction you head downhill you will
hit the road or highway. Of course avoiding the river/streams is important.
 Here
we are back at the vehicle. We packed it up quick since the snow started
to kick it up a notch. Another great trip (even with the adventure in
parking). I think we will change locations for our next snow trip to
see some different terrain and also to have easier parking. Stay tuned.
..
Here
we are back at the vehicle. We packed it up quick since the snow started
to kick it up a notch. Another great trip (even with the adventure in
parking). I think we will change locations for our next snow trip to
see some different terrain and also to have easier parking. Stay tuned.
..

The blue line is the summer trail. We headed from where is says Rainbow and headed in generally southern course to the green dot area. As discussed above the parking area and Ranger Station no longer are plowed in the winter so parking is a problem. We parked near where it says Hampshire Rocks on the map and walked it to the Rainbow Lodge (on the road) and then got on the snow shoes.